How to Integrate Seamless Gutters into Your Garden Water Collection System
If you have ever looked at your water bill during an Oklahoma summer and winced, you are not alone. A garden water collection system offers a practical way to keep your tomatoes thriving without draining your bank account, and the foundation of any effective setup starts above your head. Your gutters are not just a way to move water away from your foundation. They are the first stage of a harvesting network that can capture hundreds of gallons per storm. By the end of this guide, you will know exactly how to size, connect, and maintain a seamless gutter system that feeds a reliable garden water collection system, without leaks, mosquitoes, or legal headaches. Water conservation in 2026 is no longer a niche hobby. It is a standard practice for homeowners who want resilient gardens and lower utility costs, and the right gutter installation makes all the difference.
Why Seamless Gutters Are the Best Foundation for Rainwater Harvesting
Sectional gutters come in pieces, and every piece is a potential failure point. The joints between sections rely on sealant that degrades under Oklahoma sun and freeze-thaw cycles, eventually allowing water to drip through instead of flowing into your storage. Seamless gutters eliminate those joints entirely. Fabricated on-site from a single coil of metal, they run the full length of your roofline without a break, which means the water you collect actually reaches the downspout.
Material choice matters for a garden water collection system. Aluminum stands out as the practical winner. It is rust-proof, lightweight, and does not leach harmful compounds into the water you will use on your vegetables. Copper gutters look beautiful and last for decades, but they introduce copper ions into runoff. In high concentrations, copper can accumulate in soil and damage plant roots, making aluminum the safer choice for edible gardens. Avoid roofs with treated wood shingles or copper flashing if you plan to harvest rainwater for food crops.
Flow efficiency depends on pitch. A properly sloped seamless gutter drops a quarter-inch for every ten feet of run, which keeps water moving toward the downspout without pooling. During a heavy downpour, that steady slope prevents overflow and maximizes the volume heading into your tanks. Professional installation also lets you position downspout outlets exactly where you want your storage containers, rather than working around whatever location the original builder chose. When you control the downspout placement, you control the entire layout of your collection system.
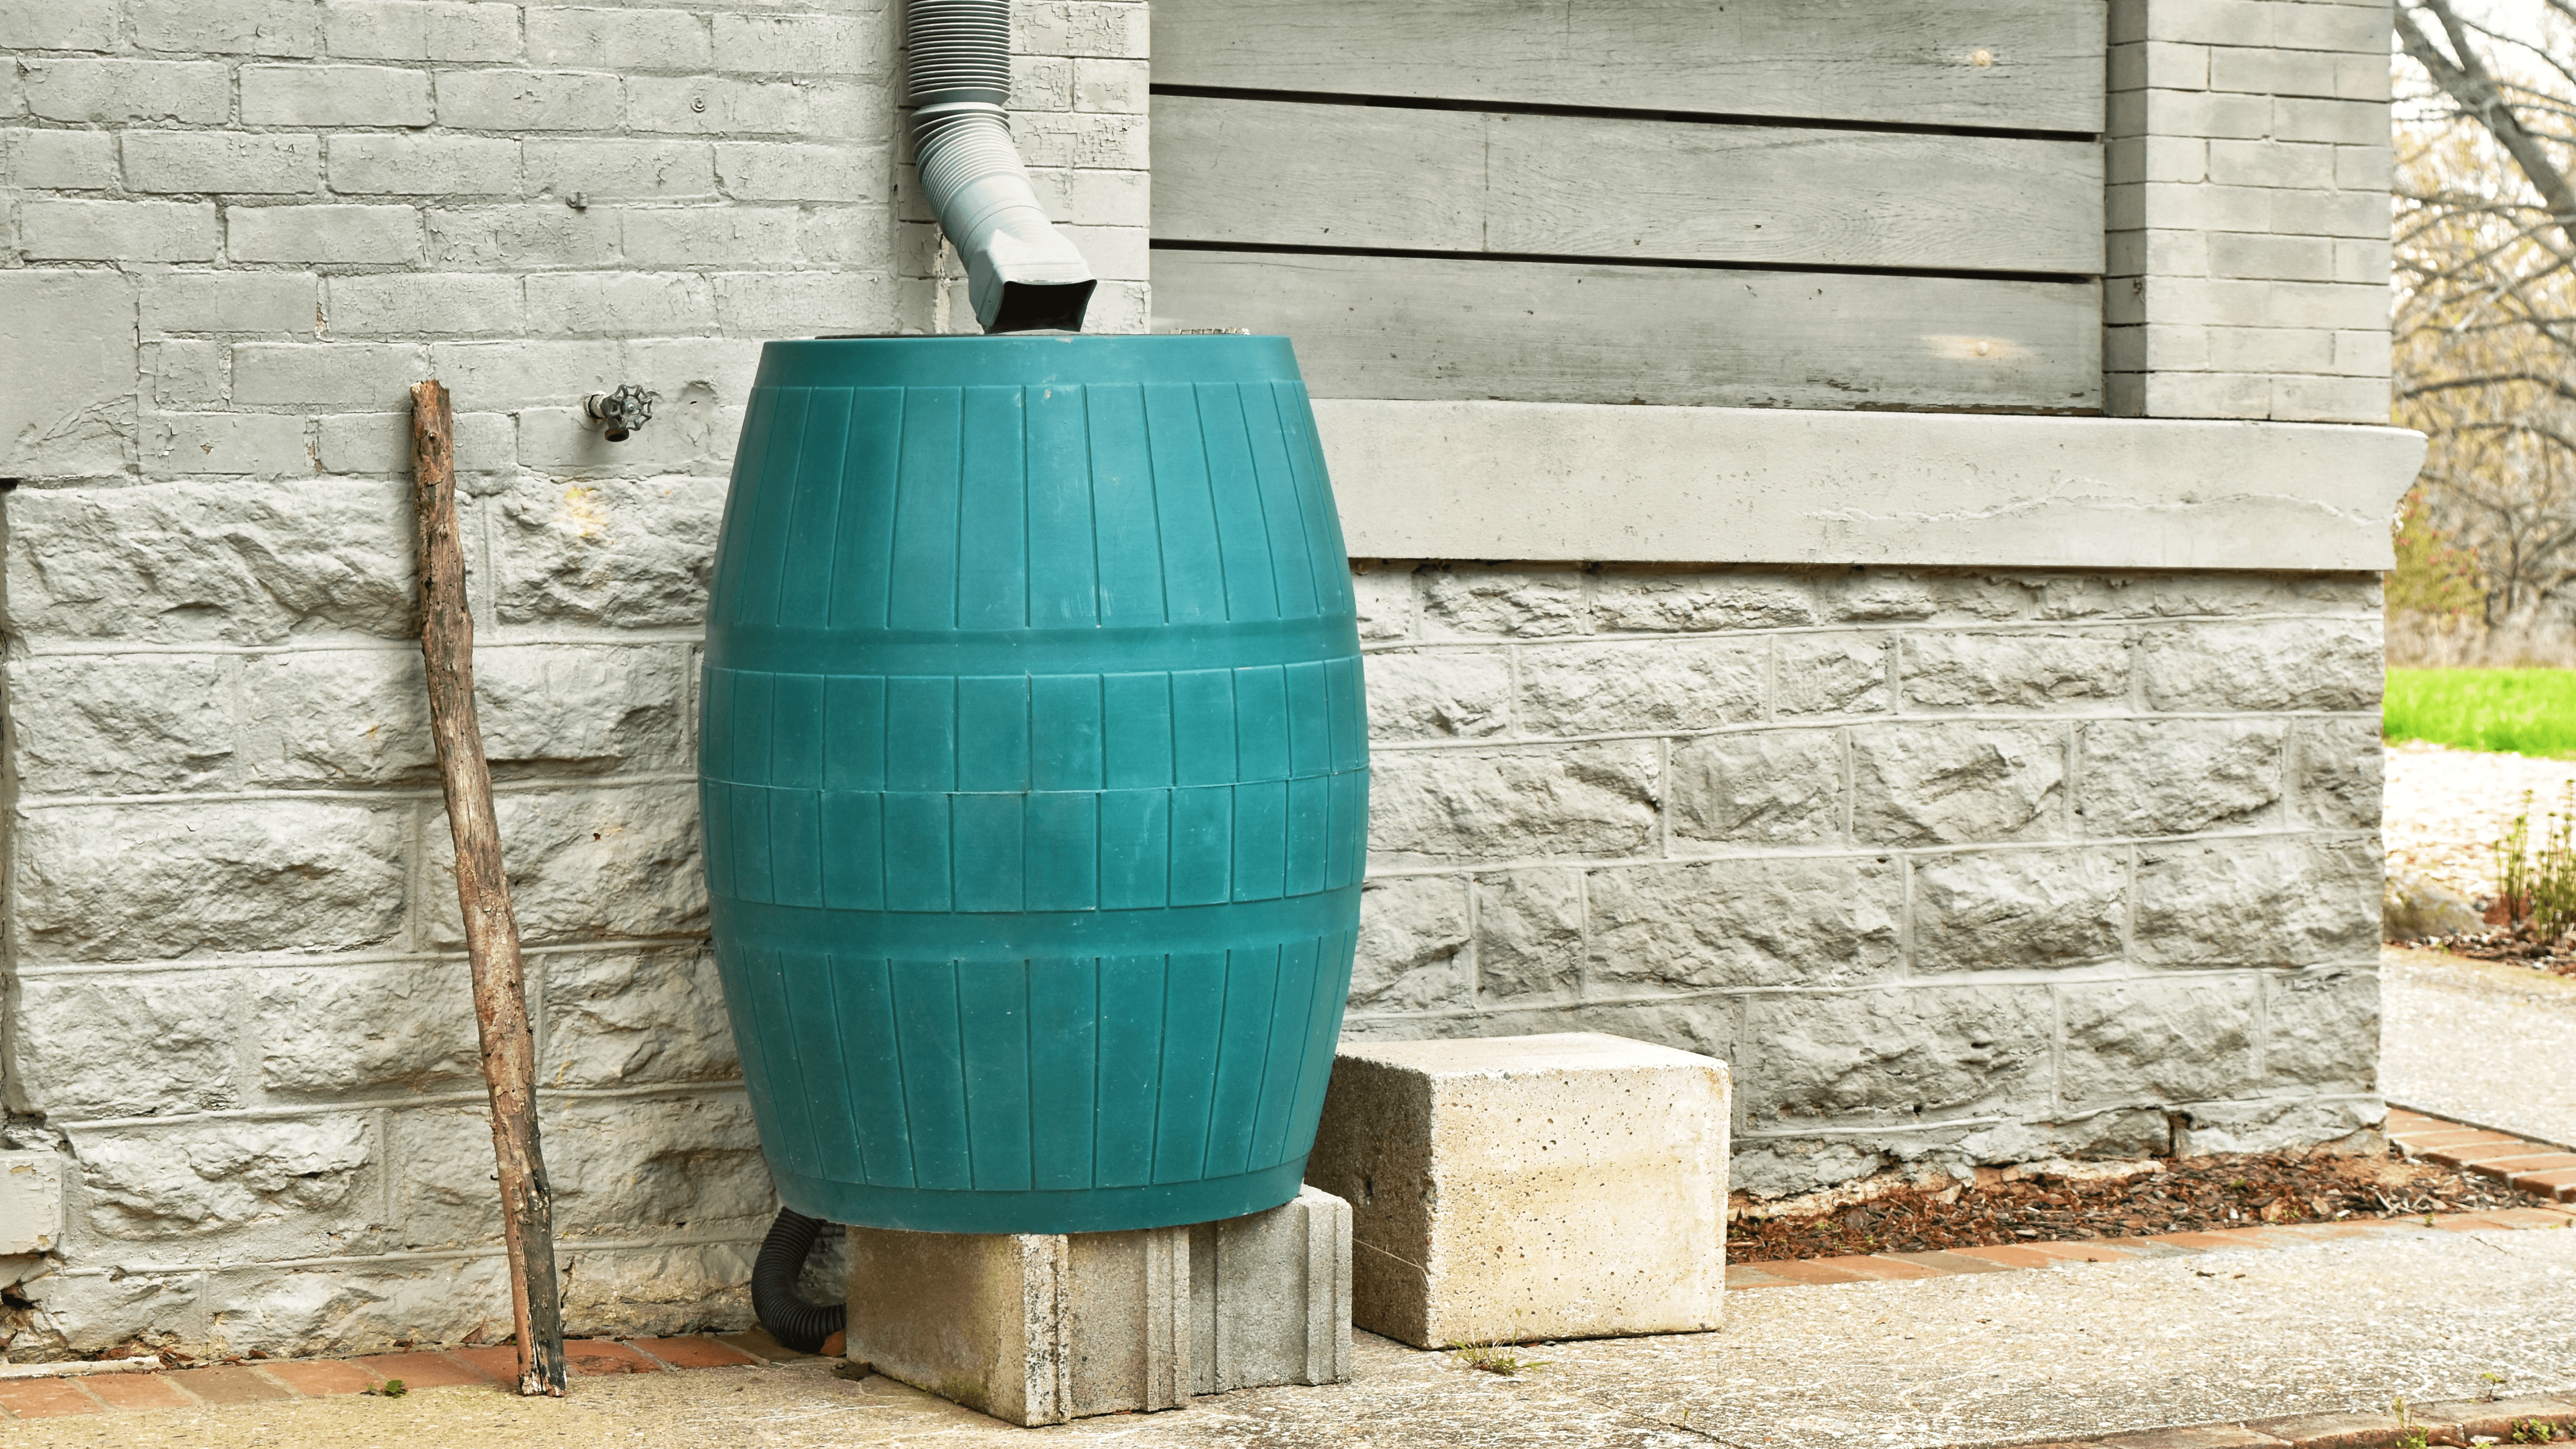
Photo by Anyra22 on Envato Elements
Not sure if your downspouts would work for a rain collection system? Schedule a FREE appointment and we can help!
Calculating Your Roof's Water Potential
The math behind rainwater collection is straightforward and surprisingly encouraging. For every half-inch of rainfall, you can expect roughly 0.3 gallons of water per square foot of roof area. A full inch of rain doubles that to 0.6 gallons per square foot. The formula looks like this: multiply your roof square footage by 0.6, and the result is your potential gallon yield per inch of rain.
Take a typical two-car garage with a 20-foot by 30-foot roof. That 600 square feet of collection surface captures approximately 360 gallons from a single inch of rain. A modest 1,000-square-foot roof section collects about 600 gallons from that same storm. Those numbers add up fast. A dry Oklahoma July might see only a few inches of rain, but a single spring thunderstorm can fill multiple barrels overnight.
Set realistic expectations, though. You will not capture every drop. Evaporation claims a small percentage, first-flush diverters send the initial contaminated runoff away from your tank, and heavy storms will push water out through overflow pipes. Plan for roughly 75 to 80 percent efficiency, and size your storage accordingly. A system that captures 300 usable gallons from a 360-gallon potential is performing well.
Essential Components of a Garden Water Collection System
A downspout diverter is the gatekeeper of your system. The first few minutes of rain wash bird droppings, dust, pollen, and roof debris into the gutter, and you do not want that entering your storage tank. A first-flush diverter captures that initial dirty water in a separate chamber, then automatically redirects the cleaner flow into your barrel once the chamber fills. This simple device dramatically improves water quality without any ongoing effort on your part.
Storage containers come in a wide range of sizes, and your choice shapes the rest of the system. A 30-gallon barrel works for a small patio garden. A standard 55-gallon food-grade drum handles a modest vegetable plot. Collapsible 53-gallon options offer seasonal flexibility. For serious gardeners, 275-gallon IBC totes or dedicated 500-gallon poly tanks provide enough capacity to bridge long dry spells. The container you choose determines your overflow strategy, your pump requirements, and your pad construction.

Photo by Conrad Marshall on Pexels
Filtration does not need to be expensive. A simple paint strainer, the kind sold at any hardware store for a few dollars, fits over the end of your downspout extension hose and catches leaves, shingle grit, and insects before they reach the barrel. Secure it with a stainless steel hose clamp, and replace it when it gets clogged or torn. This low-cost hack outperforms many commercial gutter screens because it filters at the point of entry rather than along the roofline.
Overflow management prevents the soil erosion and foundation damage that can occur when a full barrel dumps water at its base. Instead of letting overflow splash onto the ground, run an overflow hose to a rain garden, a row of perennial shrubs, or a raspberry patch. The water that your barrel cannot hold still benefits your landscape, and the intentional redirection keeps your tank pad stable and dry.
IBC Tote vs. Food-Grade Barrel: A Durability Check
IBC totes are popular in DIY circles because they hold 275 gallons and often sell for under a hundred dollars on the used market. The catch is durability. The plastic cages degrade under UV exposure, and the containers themselves are not built for long-term outdoor use. Expect to replace an IBC tote every few years, especially in Oklahoma's intense summer sun. Food-grade 55-gallon drums, by contrast, are made from thick, UV-resistant polyethylene and can last a decade or more with basic care. When you pair a permanent seamless gutter investment with a collection tank, choose a container that matches the lifespan of the gutters above it. Commercial poly tanks in the 300 to 500-gallon range offer the best combination of capacity and longevity.
Step-by-Step Installation Guide for Beginners
Step one is preparing a stable, level base. A full 55-gallon drum weighs roughly 460 pounds. A 275-gallon IBC tote tops 2,200 pounds when full. That kind of weight on uneven ground will tip, crack, or sink over time. Excavate a few inches of soil, fill with compacted gravel, and top with concrete pavers or a poured pad. The surface must be dead level in both directions. Use a carpenter's level and take your time. A tilted barrel loses storage capacity and stresses the fittings.
Step two is modifying the downspout. Mark the cut line on your existing downspout at the height where you want to install the diverter. Use a hacksaw to make a clean, square cut. Deburr the edges with a file so they do not tear the diverter gasket. Slide the diverter into place according to the manufacturer's instructions, and seal the connection with exterior-grade silicone. Let the silicone cure fully before exposing it to water.
Step three connects the diverter to the barrel. Run a flexible downspout extension hose from the diverter outlet to the inlet at the top of your tank. Keep the hose sloping downward at a steady grade. Any low spots will trap water and debris. Secure both ends with stainless steel hose clamps. Stainless hardware costs a few dollars more than galvanized but will not rust and fail after two seasons.
Step four seals the system against pests and light. Cover the barrel inlet with fine stainless steel or aluminum screen mesh, secured tightly around the hose connection. Algae needs sunlight to grow, so dark-colored barrels or opaque tanks placed in partial shade will stay cleaner. If your barrel is translucent or light-colored, wrap it or paint it with a plastic-safe dark coating. Seal the lid tightly. Any gap is an invitation for mosquitoes.
Step five installs the spigot. Drill a hole near the bottom of the barrel using a hole saw sized for your spigot fitting. A standard brass hose bibb works well and resists corrosion. Wrap the threads with plumber's tape, insert the spigot through the hole, and tighten the backing nut from inside the barrel. A bead of silicone on both sides of the hole adds insurance against slow drips. Position the spigot high enough to fit a watering can or bucket underneath.
Of course, if you're not confident building a rain water collection system yourself, we can help with a professional install. Contact us today to learn more.
Mosquito Prevention: The Critical Detail Most Guides Miss
Most guides tell you to use netting and leave it at that. Netting alone is not enough if the seal is imperfect, and in practice, most DIY seals have tiny gaps. The most reliable approach combines three layers of defense. First, seal every opening with tight-fitting gaskets or silicone. Second, install fine mesh, sometimes called no-see-um screen, over the inlet and the overflow outlet. Standard window screen is not fine enough to block newly hatched mosquitoes. Third, if water sits stagnant for more than a week, add a Mosquito Dunk containing Bacillus thuringiensis israelensis, a bacteria that kills mosquito larvae and is harmless to plants, pets, and people. Check your barrel monthly during mosquito season and replace dunks as directed.
Water Quality and Testing for Your Garden
The materials above your barrel affect the water inside it. Asphalt shingles are the most common roofing material in the United States, and they are generally safe for garden water collection after the first flush is diverted. The concern with older roofs is not the shingle material itself but the potential accumulation of heavy metals from atmospheric deposition over decades. If your roof is more than 15 years old, consider testing your collected water before using it on edible crops.
Copper roofing and copper-treated shingles present a real risk. Copper ions dissolve in acidic rainwater and concentrate in the soil over time, eventually reaching levels that stunt root growth and kill beneficial soil microorganisms. If your roof has copper components, limit your collection system to ornamental plants only. Seamless aluminum gutters paired with standard asphalt or metal roofing provide the safest combination for vegetable gardens.
Test your rainwater for pH and heavy metals if you plan to water leafy greens where the water touches the leaves directly. The ideal pH range for most vegetables falls between 5.5 and 7.0. Rainwater is naturally slightly acidic, typically around 5.6, which is perfect for garden use. Home test kits cost under thirty dollars and give you peace of mind. For an extra layer of protection on edible gardens, install a simple activated carbon filter on the spigot line. This removes any residual organic compounds and improves taste if you also use the water for pets or cleaning.
Legal Considerations for 2026
The question shows up in every online forum: is collecting rainwater illegal? In 2026, the answer for the vast majority of American homeowners is a clear no. Small-scale residential rainwater collection for gardening is legal in 48 states. Only Colorado and Utah maintain specific restrictions on residential collection, and even those states have loosened their rules in recent years to allow limited barrel use. Colorado now permits up to 110 gallons of storage for outdoor use on the property where the water is collected.
For readers in Oklahoma, where Edmond Gutter Pros operates, there are no state-level restrictions on rain barrels or garden water collection systems. The state encourages water conservation, and no permit is required for residential rainwater harvesting. Your homeowners association may have rules about visible barrel placement, so check your covenants before installing a row of bright blue drums along the front of the house. Municipal codes sometimes specify setback requirements from property lines, but these are rare for above-ground tanks under 500 gallons. A quick call to your local code enforcement office resolves any uncertainty.
Seasonal Maintenance and Winterization
Oklahoma winters bring freeze-thaw cycles that can crack a barrel left full of water. When overnight temperatures start dipping below freezing in late fall, disconnect your downspout diverter and drain every barrel completely. Open the spigot and leave it open so any residual water can expand without damaging the fitting. Store removable hoses and diverters in a garage or shed. If your barrel cannot be moved, flip it upside down or cover it with a secured tarp to keep out winter debris.
Spring recommissioning takes an afternoon. Clean your gutters thoroughly before reconnecting the system. Even seamless gutters accumulate leaves and shingle grit over winter. Flush the first-flush diverter chamber, which probably collected a season's worth of debris before you disconnected it. Inspect every screen and seal. Mosquito mesh tears easily when ice forms around it, and a torn screen is an open door for pests. Replace any damaged mesh and reapply silicone to any joint that looks cracked or pulled away.
Algae control is a warm-weather concern. Barrels placed in full sun will grow algae faster than those in shade. The north side of a building is ideal because it receives the least direct sunlight. If shade is not an option, a few drops of food-grade hydrogen peroxide per gallon of water suppresses algae without harming plants. Opaque tank paint or a barrel wrap also blocks the light algae needs. Do not use bleach. Even small amounts of chlorine can damage soil biology when the water reaches your garden.
DIY vs. Commercial System: Cost Comparison for 2026
A cost breakdown helps you decide between building your own system and buying a pre-configured one. The DIY route using a single 55-gallon food-grade barrel breaks down like this: the barrel itself costs around fifteen to twenty-five dollars from a local supplier, a first-flush diverter kit runs about twenty dollars, and a brass spigot with hose and clamps adds another ten to fifteen dollars. Total cost per barrel lands around forty-five to sixty dollars. Add a second barrel and link them with a simple overflow connector for under a hundred dollars total.
A commercial 500-gallon system represents the other end of the spectrum. These pre-built units include a poly tank, a three-quarter-horsepower external pump, a floating filter intake, and a first-flush diverter. Prices in 2026 range from twelve hundred to eighteen hundred dollars depending on the pump quality and included accessories. Installation adds more if you hire a plumber or electrician for the pump wiring.
The seamless gutters that feed both systems are a one-time investment. Professionally installed seamless aluminum gutters cost between five and twelve dollars per linear foot in the Oklahoma market, depending on fascia condition and accessibility. That investment increases home value, protects your foundation, and provides the collection infrastructure for decades. A DIY barrel system fed by quality seamless gutters will outperform a commercial tank fed by leaky sectional gutters every time. The gutter is the foundation. Spend accordingly.
Contact us today for a FREE quote.
Frequently Asked Questions
Can I use collected rainwater on my vegetables? Yes, for root-level watering with confidence. Drip irrigation or watering at the soil line keeps water off the leaves. If you overhead-water leafy greens like lettuce or spinach, filter the water through an activated carbon filter first to remove any potential roof contaminants.
How much water does my garden actually need? A 100-square-foot garden requires roughly 62 gallons per week during peak summer heat. A single 55-gallon barrel fed by a 500-square-foot roof section can fill completely from one good rainstorm, covering nearly a week of garden needs. Multiple barrels or a larger tank provide a buffer for dry spells.
Do I need a pump? For a gravity-fed system with the barrel elevated two to three feet on a sturdy stand, no pump is necessary. The water pressure will be low but sufficient for filling watering cans or running a short drip line. For large gardens or systems using 500-gallon ground-level tanks, a three-quarter-horsepower pump provides the pressure needed for hoses and sprinklers.
What if my barrel overflows constantly? Your roof catchment area is too large for your storage capacity. Add more barrels linked in series, or upgrade to a larger tank. The overflow should always be directed away from foundations and toward planted areas that can use the extra water.
Conclusion: Turn Your Gutters into an Asset
Your gutters already work hard to protect your home. With a few intentional additions, they can also sustain your garden through the hottest months of the year. Seamless gutters provide the leak-free, high-flow foundation that makes a garden water collection system reliable season after season. Whether you need a new gutter installation or a retrofit for your existing system, the team at Edmond Gutter Pros can help you design a setup that captures every drop. Measure your roof footprint, think about where you want your barrels, and reach out for a free consultation on downspout placement. The rain is free. The right gutters make sure you keep it.